
My first thought: I only need the blockchain
The naive starting point — React calling contracts directly, MetaMask as the only backend, and why it actually works at small scale.
I want to be honest about how I started building Web3 applications.
My mental model was simple: blockchain is the backend. Frontend talks to blockchain. Done.
No Express server. No database. No Redis. No indexer. Just React, MetaMask, and a Solidity contract.
And for the first few weeks — it worked. Beautifully. My dApp loaded fast, votes registered on-chain, MetaMask confirmations appeared, and I felt like I was building something genuinely new.
I was right about one thing: blockchain really was my only backend. I was wrong about one thing: that this would scale beyond 20 users.
[!NOTE] Two real projects, one story. Track 2 follows two of my actual projects:
- ChainElect — a blockchain voting system, built first, broken first. It's the learning experiment. Modules M2.1 through M2.3 use it to hit the real pain points: RPC limits, exposed API keys, IPFS slowness.
- Socio3 — a social dApp built after ChainElect, with every lesson from ChainElect applied. Modules M2.4 and M2.5 use it to show the evolved architecture: Redis caching, The Graph indexing, proper hybrid design.
ChainElect = what I built when I thought I understood Web3. Socio3 = what I built after I actually did.
1. The Story: ChainElect v0.1
When I first built ChainElect — a decentralized voting system — the architecture was as simple as I could make it:
No server. No auth system. No cache. Just the frontend calling the contract.
For reading vote counts: contract.getCandidate(id).
For writing votes: contract.vote(candidateId) → MetaMask popup → confirm → wait for tx.
The voter registration flow worked. The vote casting worked. The admin panel worked. I demo'd it at a hackathon with 12 participants and it ran perfectly.
"This is it," I thought. "This is why Web3 is powerful. No backend required."
2. Why It Actually Works at Small Scale
The naive architecture has a real advantage: simplicity.
No server means:
- No server to maintain, host, or pay for
- No server-side auth bugs
- No database to design or migrate
- No API endpoints to document
- No CORS issues
- No downtime from server failures
For a hackathon prototype with 10-20 users, this is genuinely optimal. The contract handles state. MetaMask handles auth. The RPC node handles reads. Everything is decentralized.
Here is the complete connection logic from ChainElect v0.1:
This is it. No JWT. No server session. No database lookup. The user's MetaMask address IS their identity. The contract IS the database. The RPC node IS the API.
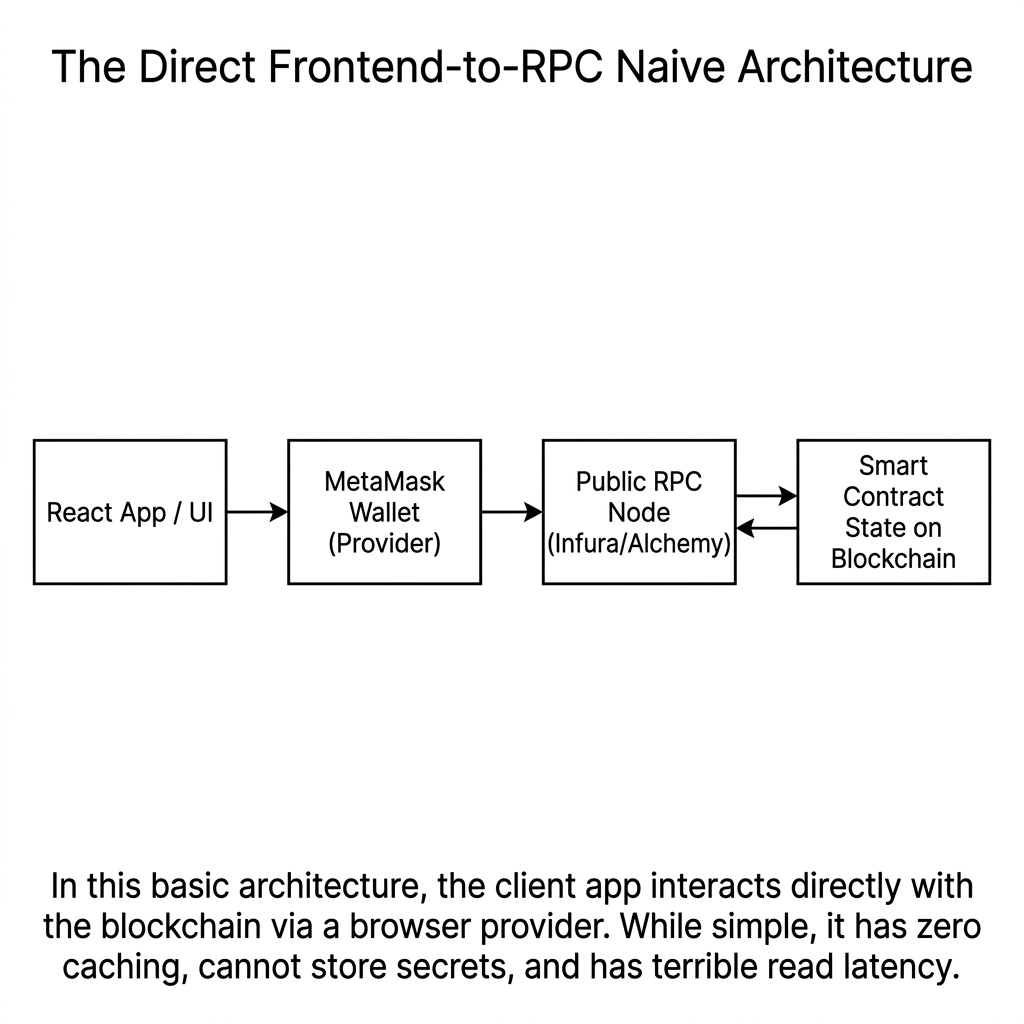
3. The Architecture Diagram
[!TIP] VISUAL TRIGGER FOR FRONTEND: This is Module 1's architecture state. Throughout Track 2, this diagram will evolve — new boxes will appear (Backend, Redis, Subgraph) as each module introduces them. Animate the progression of this diagram across modules to show the dApp literally growing its architecture.
4. Technical Explanation: What MetaMask Actually Does Here
In this naive architecture, MetaMask is doing three jobs simultaneously — which is both its strength and its limitation:
Job 1: Key Manager Stores your private key securely. Signs transactions without exposing the key to the frontend JavaScript code.
Job 2: RPC Provider
Connects to a blockchain node via RPC. When you call window.ethereum, you're talking to MetaMask's built-in RPC provider which routes calls to Infura, Alchemy, or a custom node.
Job 3: Auth Provider
eth_requestAccounts returns your wallet address. In the absence of any other auth system, the wallet address IS the user's identity. If the address is 0x71C...397, that user is "logged in".
The problem with MetaMask doing all three jobs: you have zero control over any of them from the server side. You cannot invalidate a session. You cannot rate-limit a user. You cannot block a wallet address without writing a new contract transaction. The user's browser is in complete control.
The naive architecture is not "wrong" — it's the correct starting point. Every complex Web3 system started as a simple contract + frontend. The key is recognizing when complexity is being forced on you by real user behavior, not adding it preemptively. Modules M2.2 through M2.5 are the story of complexity being forced on us, one painful production problem at a time.
5. Live From the Repo: ChainElect's Actual Starting Point
Here's the real README from ChainElect — the project this entire track is built around. This isn't a curated excerpt; it's pulling live from GitHub right now:
Clone the ChainElect repository from the context/ folder. Run npm install and npm run dev. Open the browser, connect MetaMask (set to Polygon Amoy testnet), and observe the contract connection flow in Conn_web.jsx. Identify which function reads the candidate list from the chain. How many RPC calls does a single page load make?
Was this lesson helpful?
Let us know what you think of this specification. (submitting anonymously)